How to Read and Draw Bond-Line Structures
Learn to read and draw bond-line (skeletal) structures: carbons at corners and ends, hidden hydrogens, double and triple bonds, and common mistakes.
Overview
Before jumping into reactions, mechanisms, and all the fun stuff, there’s one skill you need first: You need to know how to read a molecule.
Organic chemists have their own visual language. Instead of drawing every single carbon, hydrogen, and bond, we use shortcuts that make molecules much quicker and easier to understand.
At first, these structures might look like random lines and zigzags. But once you learn the rules, you’ll start seeing atoms, bonds, functional groups, and entire molecules hiding inside them.
And trust me, once you can read structures, organic chemistry gets a lot easier.
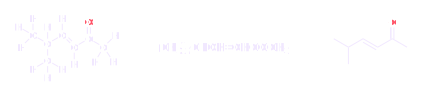
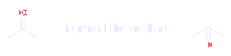
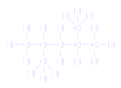
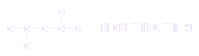
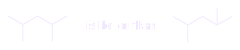
Here’s the cool part: the same molecule can be drawn in several different ways.
The three structures below might look different, but they actually represent the exact same molecule:
Out of all the ways we can draw molecules, bond-line structures are the ones you’ll see the most. Why? Because they’re fast to draw, easy to read, and packed with information.
Instead of writing every carbon and hydrogen, organic chemists use simple lines and corners to represent them. At first, they might look like a bunch of random zigzags. But those zigzags are actually telling you where the carbons, hydrogens, and bonds are.
And you’re going to see them everywhere in organic chemistry: reactions, mechanisms, synthesis problems, exams… basically the whole package. So being able to look at a bond-line structure and instantly understand it is a must-have organic chemistry skill.
How to Read Bond-Line Structures
Okay, so what are all those lines and zigzags actually telling you?
A bond-line structure shows the carbon skeleton of a molecule, basically the carbon framework that holds everything together. Here’s the golden rule:
Every corner and every endpoint = a carbon atom. Yep. The C’s are hiding.
Any important functional groups or other atoms, such as –OH, –Br, –Cl, or –NH₂, are usually written out so you can see them. So when you look at a zigzag structure, don’t just see lines. Start looking for:
Corner → Carbon
Endpoint → Carbon
Written atom → Exactly what it says
For example, take the structure below and count every corner and endpoint.
You should find 7 carbon atoms.
Double & Triple Bonds
Not every bond is a single bond. Sometimes atoms share two or even three bonds. Luckily, bond-line structures make these super easy to spot:
Single bond → 1 line
Double bond → 2 lines
Triple bond → 3 lines
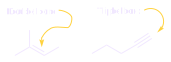
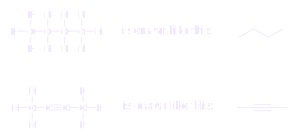
So if you see two lines between two carbons, you’re looking at a C=C double bond. See three lines? That’s a C≡C triple bond. Pretty simple: just count the lines! Take a look at the examples below:
There’s one important thing to remember when drawing a triple bond:
Keep it straight: no zigzags!
Why? A carbon–carbon triple bond (C≡C) has a linear geometry, so the atoms around the triple bond line up in a straight line.
This can feel a little weird at first because bond-line structures normally love their zigzags. And when everything suddenly goes straight, it can become harder to tell where the carbons are hiding. Just remember:
A C≡C triple bond always connects TWO carbon atoms.
Sometimes you’ll see a small gap on either side of a triple bond.
Don’t worry, it’s still the same C≡C triple bond. It’s simply another common way chemists draw it. You should get comfortable recognizing both styles, because you’ll see both in textbooks, reaction schemes, and exams.
Here’s the important part: The two carbons in the triple bond, and the carbons directly attached to them, form a straight line. That’s because the triple-bonded carbons have linear geometry. After that straight section? The molecule goes right back to the usual zigzag pattern.
Practice problems
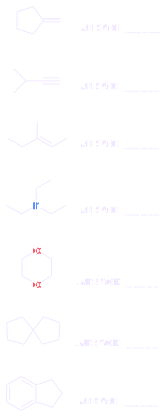
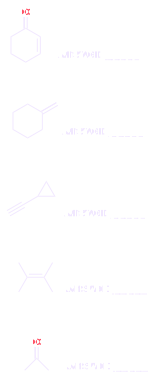
Time to test your bond-line skills. How many carbon atoms are hiding in each structure below? 👀 Remember:
Every corner = a carbon
Every endpoint = a carbon
Where Are All the Hydrogens?
Now that you know how to find the hidden carbons, it’s time to find the hidden hydrogens. Here’s the trick:
In bond-line structures, most hydrogens attached to carbon are not drawn.
Why? Because imagine drawing every single hydrogen in a huge molecule… yeah, no thanks. Instead, chemists leave them out to keep structures clean, simple, and fast to draw.
But there’s an important exception: Hydrogens attached to atoms like oxygen or nitrogen are usually shown. For example:
O–H → hydrogen is shown
N–H → hydrogen is shown
C–H → hydrogen is usually hidden
So when you see a bond-line structure, remember: The hydrogens didn’t disappear, they’re just hiding.
So if hydrogens attached to carbon are hidden… how are you supposed to know how many there are? Luckily, carbon gives us a very useful rule:
A neutral carbon wants a total of 4 bonds.
That’s the key to finding hidden hydrogens. Look at the highlighted carbon in a structure. Say it currently has 2 visible bonds to other atoms. But carbon needs 4 bonds total. So what’s missing?
4 − 2 = 2
That means the highlighted carbon must have 2 hidden hydrogens. So you can think of it like a tiny chemistry puzzle:
Count the bonds you can see → subtract from 4 → the rest are hydrogens.
For this carbon: 2 visible bonds + 2 C–H bonds = 4 bonds total. Those hydrogens might be invisible in the drawing, but now you know exactly where they’re hiding. 😉
Practice problems
For each molecule below, figure out how many hydrogen atoms are attached to each carbon. Remember the golden rule: Carbon wants 4 bonds. So for each carbon: Count the bonds you can see → fill the rest with hydrogens.
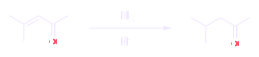
Now we can see the real advantage of bond-line structures. Yes, they’re faster to draw because we don’t have to write every C and H. But even better? They make reactions much easier to understand. Take this reaction:
You can figure out what happened… but you might have to stare at all those letters for a moment. Now draw the exact same reaction using bond-line structures.
Suddenly, the change practically jumps out at you.
C=C → C–C. The double bond disappeared and became a single bond.
What happened? Two hydrogen atoms were added across the double bond. That’s a reaction called hydrogenation. 🧪
And this is where bond-line structures really shine. Instead of trying to decode a wall of CH₃, CH₂, C, H, C, H…, you can focus on the important question: What actually changed?
As you get more comfortable reading bond-line structures, you’ll start spotting these changes almost instantly. Double bond disappeared? New group appeared? A bond formed or broke? You’ll begin to see the reaction instead of trying to decode it. And that’s when organic chemistry starts becoming a lot more fun.
How to Draw Bond-Line Structures
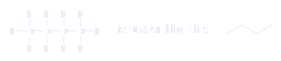
You know how to read bond-line structures. Now it’s time to learn how to draw them yourself. And don’t worry, it’s much easier than drawing every single C and H like this:
Step 1: Find the Carbon Skeleton 🦴
Start by looking at how all the carbon atoms are connected. That chain of carbons is the molecule’s carbon skeleton, and that’s what you’ll turn into your zigzag. Remember:
Carbon atoms → hidden
Hydrogens attached to carbon → hidden
Other atoms → shown
So atoms like O, N, Br, Cl, S and others must actually appear in your drawing. For the molecule above, once we remove all the unnecessary C’s and H’s, we’re left with a much cleaner bond-line structure:
Before you start drawing your own structures, here are a few rules that will make them look much cleaner.
1. Carbon Chains Love Zigzags
A straight chain of carbon atoms should normally be drawn as a zigzag, not as one long straight line. So instead of thinking C–C–C–C, think: zig → zag → zig. And remember: every corner and endpoint represents a carbon.
2. Give Double Bonds Some Space
When you draw a C=C double bond, try to point the surrounding bonds away from the double bond. Why? Because it makes the structure much easier to read and prevents everything from looking cramped. Think of your double bond as needing a little personal space.
Clear and open = good drawing.
Squished and crowded = harder to read.
3. Your Zigzag Can Start Either Way
Here’s some good news: It doesn’t matter whether your zigzag starts by going up or down. Both can represent the exact same molecule. What matters is that the atoms are connected correctly. So don’t waste time wondering: “Wait… should my first line go ↗ or ↘?” Either is fine. Focus on the connections, not the direction of the zigzag.
Once you get comfortable with these rules, turning a full molecular structure into a clean bond-line drawing becomes almost automatic.
Mistakes to Avoid
Bond-line structures are simple once you know the rules, but there are a few mistakes that can turn a perfectly good molecule into a chemistry crime scene. Here are the big ones to watch out for:
1. Never Give Carbon More Than 4 Bonds ❌
This is the golden rule of carbon: Carbon can have a maximum of 4 bonds. If you draw a neutral carbon with five bonds, something has gone very wrong. 🚨 For example:
4 single bonds → ✅
1 double + 2 single bonds → ✅
1 triple + 1 single bond → ✅
5 bonds → ❌ Nope.
Whenever you’re unsure, just count. Carbon = 4 bonds max. Later, you’ll learn why this happens by looking at carbon’s orbitals and electronic structure.
2. Don’t Mix Drawing Styles
When drawing a molecule, choose a style and stick with it. You can either draw the full structure (show the C’s and the H’s):
OR draw a bond-line structure (hide the carbon labels and the hydrogens attached to them):
What you shouldn’t do is write all the C’s but randomly leave out the H’s.
C’s shown + H’s missing = ❌
C’s and H’s shown = ✅
Bond-line structure = ✅
For organic chemistry, the bond-line version is usually the cleanest and fastest option.
3. Give Your Bonds Some Space
When drawing the zigzag around a carbon, try to spread the bonds as far apart as reasonably possible.
Avoid squishing several bonds together in the same direction. Why? Because a well-spaced structure is much easier to read, understand, and follow during reactions. Think:
Spread out = clean ✅
Cramped together = confusing ❌
Your molecule doesn’t need to be a work of art: it just needs to be clear.
The Bond-Line Survival Rules 🧪
If you remember nothing else, remember these three:
Carbon never gets more than 4 bonds.
Don’t randomly mix full structures with bond-line notation.
Keep your bonds clean and spread out.
Follow those, and your bond-line drawings are already going to look much better.
Practice questions with answers
- In a bond-line structure, every corner and every endpoint represents: Answer: A carbon atom
- How many carbon atoms are in a six-membered ring with one line (a methyl group) coming off a corner? Answer: 7
- In a bond-line structure, two lines between two carbons mean: Answer: A C=C double bond
- How should a C≡C triple bond be drawn? Answer: Straight, with no zigzag, because the geometry is linear
- Which hydrogens are usually written out in a bond-line structure? Answer: Hydrogens attached to O or N
- A neutral carbon shows 2 visible bonds in a bond-line structure. How many hidden hydrogens does it have? Answer: 2
- What is the maximum number of bonds a neutral carbon can have? Answer: 4
- Which of these is a drawing mistake? Answer: Writing all the C's but leaving out the H's
- The hydrogenation of (CH₃)₂C=CHCOCH₃ with H₂/Pt changes which bond? Answer: C=C becomes C–C (two hydrogens added)
Keep learning